API Migration Guide
Migrating from v1 to v2
This API Migration Guide is designed to provide you with specific details on what you need to do to update your current integration to work with the new Gori API v2.
📌 Important!
This migration guide documents the differences between the Gori API v2 and the Gori API v1 which will be retired in June 2024. Users are strongly encouraged to migrate as soon as possible. Please refer to Gori API v2 documentation which has been moved to Swagger at https://docs-dev.goricompany.com/api/documentation.
Update the API Authentication to OAuth 2.0
Gori has implemented an OAuth 2.0 security model for all APIs to enhance security, reduce fraud and provide enhanced API capabilities. As part of the new security process, Gori will deprecate the existing API key authentication for our APIs. Gori will no longer distribute API keys and all API transactions with Gori after May 31, 2024 will require clients to implement the OAuth 2.0 security model by sending a bearer token with every API request. Please ensure your integration has migrated to OAuth 2.0 as soon as possible to prevent future service disruptions.
For detailed instructions on how to authenticate using OAUTH 2.0, please see refer to the API Authentication at the end of this guide.
Update the Endpoint URLs from v1 to v2
Gori supports two different API environments to which you can make API requests. The different environments allow you to test your calls to the Gori API before you move your application to production. You address the specific environment you want to target using the API’s base URL.
The following table shows the available staging and production base URLs for Gori API v2.
| Environment | URL |
|---|---|
|
Staging |
https://staging.api.goricompany.com/v2 |
|
Production |
https://api.goricompany.com/v2 |
GET https://api.goricompany.com/v1/shipments
For v2, update the URL to the following:GET https://api.goricompany.com/v2/shipments
Make Required Changes
In addition to implementing the new OAUTH 2.0 authentication method, we have introduced several breaking changes to the API which are described below.
📌 Note!
You only need to make the required changes relevant to your existing use of the Gori API. If you are shipping to a U.S. territory, military address, diplomatic address or internationally, you need to start including the new HS tariff number and Country of Origin properties in the Create Shipment request (https://docs-dev.goricompany.com/api/documentation#/Shipments/createShipment).
1. New OAUTH 2.0 POST /auth/token endpoint. Please see the following API Authentication section for detailed instructions on how to authenticate using the new OAUTH 2.0 access token endpoint.
2. A new property called ship_date has been added to the POST /shipments endpoint. This property must be specified for USPS and FedEx One Rate shipments. If it is not specified, the date the shipment is created will be used as the default.
📌 Important!
The date specified must be no more than 7 days after the date the shipment is created. If the specified date is less than the date of the shipment, an error will be returned and the shipment will not be created.
3. The packageType property for GET /shipments/rates, POST /shipments and POST /return_shipments endpoints has changed to package_type.
4. If there is no value for the zipcode property provided in a request then the value returned in the response will be null instead of an empty string.
5. The HS tariff number must be based on the Harmonized Commodity Description and Coding System developed by the World Customs Organization. For additional information, please see: https://hts.usitc.gov/current. To specify the HS tariff number, include the hs_tariff_number property and HTS code (6 to 14 characters) in the create shipment request as shown below:
{"shipment": {"customs": {"items": [ {"hs_tariff_number": "3926.20"} ] } } }
6. The Country of Origin is a 2-digit alpha country code defined by ISO and is required for international address. Please see: https://www.iso.org/obp/ui/#search for a complete list of codes. To specify the country of origin, include the country_of_origin property and ISO Alpha-2 code (2 characters) in the create shipment request as shown below:
{ "shipment": {"customs": {"items": [ {"country_of_origin" : "US"} ] } } }
7. The error response now includes a new property called "log_id".
8. The reference1 and reference2 properties of the POST /shipments endpoint and POST /return_shipments endpoints have changed to reference_1 and reference_2.
Testing
Getting Help
API Authentication
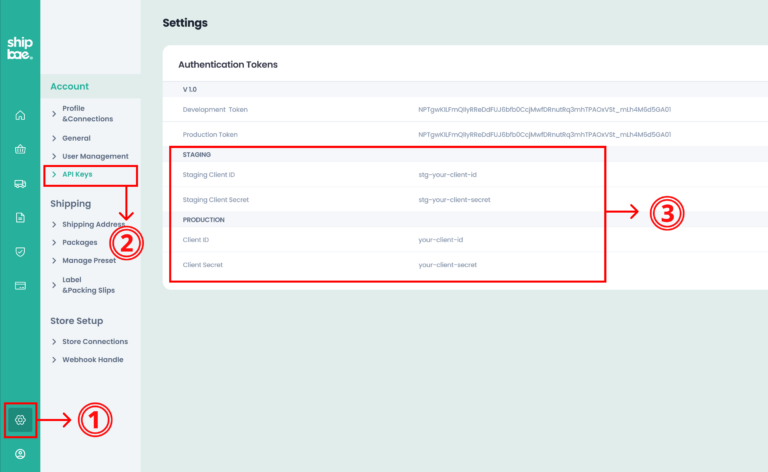
Gori creates for each client a unique set of staging and production OAuth 2.0 credentials called the Client ID and Client Secret. You pass these credentials in the body of each authentication request to retrieve a new access token from the OAuth 2.0 server. You then use the access token to act as the authentication of the API request in subsequent requests. The following sections describe each of these steps.
Getting the OAuth 2.0 Credentials
📌 Important!
You should never use or disclose your credentials in public.
Getting an Access Token
Once you have a valid set of credentials (see Getting the OAuth 2.0 Credentials), you can use the following steps to construct and make an authentication request:
1. Specify the authorize API endpoint:
https://staging.api.goricompany.com/auth/token
2. Add a Content-Type header to set the media type as JSON:
Content-Type: application/json
3. Finally, make the API request using a tool like curl:
curl –location 'https://staging.api.goricompany.com/v2/auth/token/'
–header 'Content-Type: application/json'\
–data '{
"client_id": "{your-client-id}",
"client_secret": "{your-client-secret}",
"grant_type": "client_credentials"
}'
4. Once the API request has been made, the OAuth 2.0 server should respond with the new token as shown in the following example:
'{
"token_type": "Bearer",
"expires_in": 43200,
"access_token": "{access_token}"
}'
📌 Important!
Access tokens are valid for 12 hours. We recommend a new access token be obtained from the authorize API endpoint before the current access token expires.
Once you have a valid access token, you can make an API request to a protected resource as described in the following section.
Making a Request
To access protected resources, you will need to use the access token returned from the OAuth 2.0 server during client authentication (Getting an Access Token). The access token will be used as the "bearer token" in subsequent API requests using the Bearer HTTP authentication scheme (called Bearer authentication). The client must send this bearer token in the HTTP Authorization header when making requests to protected resources. Following shows the format of the Authorization header along with the bearer token (the access token):
Authorization: Bearer {access_token}
The way to do this using a tool like curl is to use the –header flag, which is used to include an extra header in the request when sending HTTP requests to a server. In our case, –header "Authorization: Bearer {access_token}". For example, to authenticate and retrieve all shipments execute:
curl ‐‐location 'https://staging.api.goricompany.com/v2/shipments?
page_size=100&page=1&id_after=0&reference_1=12345&created_at_before=2021-07-27'\
‐‐header 'Accept: application/json'\
‐‐header 'Authorization: Bearer {access_token)'
Requests with no Authorization header will be rejected with a 401 status code. If this occurs, you need to get a new access token and try the request again
API 迁移指南
从 v1 迁移到 v2
本 API 迁移指南旨在为您提供有关更新当前集成以使⽤新的 Gori API v2 所需执⾏的操作的具体详细信息。
📌 重要的!
本迁移指南记录了 Gori API v2 和将于 2024 年 6 月停⽤的 Gori API v1 之间的差异。
强烈建议⽤⼾尽快迁移。
请参阅已移至 Swagger 的 Gori API v2 ⽂档(⽹址为 https://docs‑dev.goricampany.com/api/documentation )。
将 API 身份验证更新为 OAuth 2.0
有关如何使⽤ OAUTH 2.0 进⾏身份验证的详细说明,请参阅本指南末尾的 API 身份验证。
将端点 URL 从 v1 更新为 v2
Gori 支持两种不同的 API 环境,您可以向其中发出 API 请求。不同的环境允许您在将应⽤程序转移到生产环境之前测试对 Gori API 的调⽤。您可以使⽤ API 的基 本 URL 来定位要定位的特定环境。
| 环境 | ⽹址 |
|---|---|
|
分期 |
https://api-staging.goricompany.com/v2 |
|
生产 |
https://api.goricompany.com/v2 |
获取 https://api.goricampany.com/v1/shipments
对于 v2,将 URL 更新为以下内容:获取 https://api.goricompany.com/v2/shipments
进⾏必要的更改
除了实施新的 OAUTH 2.0 身份验证方法外,我们还对 API 进行了多项重大更改,如下所述。
📌 注意:
您只需进行与您目前使用的 Gori API 相关的必要更改。如果您要将货物运送到美国领土、军事地址、外交地址或国际地址,则需要开始在创建货件请求 https://docs-dev.goricampany.com/api/documentation#/Shipments/createShipment 中包含新的 HS 关税编号和原产国属性。
1. 新的 OAUTH 2.0 POST /auth/token 端点。请参阅以下 API 身份验证部分,了解有关如何使用新的 OAUTH 2.0 访问令牌端点进行身份验证的详细说明。
2. 一个名为 ship_date 的新属性已添加到 POST /shipments 端点。必须为 USPS 和 FedEx 单一费率货件指定此属性。如果未指定,则将使用货件创建日期作为默认值。
📌 重要的!
指定的日期不得晚于货件创建日期后的 7 天。如果指定的日期早于货件日期,则会返回错误,并且不会创建货件。
3. GET /shipments/rates 的 packageType 属性, POST /shipments 和 POST /return_shipments 端点已更改为 package_type。
4. 如果请求中没有提供 zipcode 属性的值,则响应中返回的值将为 null,而不是空字符串。
5. HS 关税编号必须基于世界海关组织制定的《协调商品描述及编码系统》。有关更多信息,请参阅:https://hts.usitc.gov/current。要指定 HS 关税编号,请在创建货件请求中包含 hs_tariff_number 属性和 HTS 代码(6 到 14 个字符),如下所示:
{"shipment": {"customs": {"items": [ {"hs_tariff_number": "3926.20"} ] } } }
6. 原产国是 ISO 定义的 2 位字母国家代码,是国际地址所必需的。请参阅:https://www.iso.org/obp/ui/#search获取完整的代码列表。要指定原产国,请在创建货件请求中包含 country_of_origin 属性和 ISO Alpha-2 代码(2 个字符),如下所示:
{ "shipment": {"customs": {"items": [ {"country_of_origin ": "US"} ] } } }
7. 错误响应现在包含一个名为“log_id”的新属性。
8. POST /shipments 端点和 POST /return_shipments 端点的 reference1 和 reference2 属性已更改为 reference_1 和 reference_2。
测试
寻求帮助
API 身份验证
Gori 为每个客⼾端创建一组唯一的暂存和生产 OAuth 2.0 凭据,称为客⼾端 ID 和客⼾端密钥。您可以在每个身份验证请求的正⽂中传递这些凭据,以从 OAuth 2.0 服务器检 索新的访问令牌。然后,您可以在后续请求中使⽤访问令牌作为 API 请求的身份验证。以下部分描述了每个步骤。
获取 OAuth 2.0 凭据
📌 重要的!
您绝不应该在公开场合使⽤或透露您的凭证。
获取访问令牌
1. 指定授权 API 端点:
https://api.goricompany.com/auth/token
2. 添加 Content‑Type 标头以将媒体类型设置为 JSON:Content-Type: application/json
3.最后,使⽤ curl 等⼯具发出 API 请求:curl –location 'https://api-staging.goricompany.com/v2/auth/token/'
–header 'Content-Type: application/json'\
–data '{
"client_id": "{你的客⼾端id}",
"client_secret": "{你的客⼾端秘密}",
"grant_type": "client_credentials"
}'
4. 发出 API 请求后,OAuth 2.0 服务器应使⽤新令牌进⾏响应,如下例所示:'{
"token_type": "Bearer",
"expires_in": 43200,
"access_token": "{access_token}"
}'
📌 重要的!
访问令牌的有效期为 12 小时。我们建议在当前访问令牌过期之前从授权 API 端点获取新的访问令牌。
拥有有效的访问令牌后,您可以向受保护的资源发出 API 请求,如下节所述。
发出请求
要访问受保护的资源,您需要在客⼾端身份验证(获取访问令牌)期间使⽤从 OAuth 2.0 服务器返回的访问令牌。访问令牌将在使⽤
Bearer HTTP 身份验证方案(称为 Bearer 身份验证)的后续 API 请求中⽤作“承载令牌”。客⼾端在向受保护的资源发出请求时必须在
HTTP 授权标头中发送此承载令牌。以下显示了授权标头以及承载令牌(访问令牌)的格式:
授权:持有者{access_token}
使⽤ curl 等⼯具执⾏此操作的方法是使⽤ ‒header ag,它⽤于在向服务器发送 HTTP 请求时在请求中包含额外的标头。在我们的例⼦中,‒header
“Authorization: Bearer {access_token}”。例如,要验证和检索所有货件,请执⾏:
卷曲 ‑location https://api‑staging.goricompany.com/v2/shipments?
page_size=100&page=1&id_after=0&reference_1=12345&created_at_before=2021-07-27’\
‐‐header 接受:application/json \
‐‐header 授权:承载 {access_token)
没有授权标头的请求将被拒绝,并显示 401 状态代码。如果发生这种情况,您需要获取新的访问令牌并再次尝试请求